Spec - Part II: The Layout
GUI Development in Pharo Smalltalk using Spec. It covers the layouts and tidies up the Greeter application built in part I.
Last updated: March 2019
 First of all: have you read the first part of this series yet? If not, please do so as we are going to iterate over what was done there.
As you recall, the greeter application which was built earlier was fully functional. However, it was not easy on the eye --in other words, it was very ugly. As promised, we will tidy it up in this episode.
So, obviously, we can use 4
So it seems we have all the information we need. Just one minor thing: The overall window layout is a perfect fit for a
Finally we have the design breakdown using our tools.
As the first step, we need to add two (informational) labels to our widgets.
As usual, the next step is to instantiate the widgets:
And finally we have to tell Spec about the layout. As you can remember, modifying layout is done in the class-side
One important thing to note is that when nesting a layout inside another layout using either
Run
Image source: buildipedia.com
Last updated: March 2019
Introduction
 First of all: have you read the first part of this series yet? If not, please do so as we are going to iterate over what was done there.
As you recall, the greeter application which was built earlier was fully functional. However, it was not easy on the eye --in other words, it was very ugly. As promised, we will tidy it up in this episode.
The Question Of The Ages
"What do you want!?" Before setting off on the road of endlessly pushing and pulling widgets around, let's first settle for a target design. For the rest of this episode, we will try to achieve the following design (this design is done in LibreOffice Draw and is not a snapshot from the system): |
| Figure 1 - The target design for this episode |
Layout Smithing Tools
There are about half a dozen of layouts and widgets (which can be used to layout other widgets) in Spec. But for the sake of simplicity, only the two most basic ones are used in this episode:SpecColumnLayout: You're already familiar with this layout as it was the only one used in part I. It is, as the name implies, a column. Widgets will be added vertically, from top to bottom, like a stack; meaning the first widget which is added using add: will be at the top, and the last widget at the bottom of the column.SpecRowLayout: Very similar toSpecColumnLayoutbut everything is done horizontally. Widgets will be added horizontally, from left to right; meaning the first widget which is added using add: will be at the left, and the last widget at the right of the row.
Talk To Me In Rows & Columns!
It's time to breakdown the target design to see how it can be achieved using our two layout tools. As you have already spotted, there are 4 rows in the design. |
| Figure 2 - Breakdown by rows |
So, obviously, we can use 4
SpecRowLayouts to achieve this. Also, you can see that the titles are themselves neatly arranged in their own row inside Title row. |
| Figure 3 - Breakdown by rows - Title radio buttons |
So it seems we have all the information we need. Just one minor thing: The overall window layout is a perfect fit for a
SpecColumnLayout as 4 rows are vertically added next to each other. |
| Figure 4 - Breakdown - Main column |
Finally we have the design breakdown using our tools.
Pharo The Design
Time to convert our design into something Pharo understands.As the first step, we need to add two (informational) labels to our widgets.
ComposablePresenter subclass: #MyFirstWindow
  instanceVariableNames: 'labelGreeting textName buttonGreet radioMr radioMrs radioMs labelName labelTitle'
  classVariableNames: ''
package: 'My-Spec-Tutorial'As usual, the next step is to instantiate the widgets:
initializeWidgets
  self instantiateModels: #(
    labelGreeting LabelPresenter
    textName      TextInputFieldPresenter
    buttonGreet   ButtonPresenter
    radioMr       RadioButtonPresenter
    radioMrs      RadioButtonPresenter
    radioMs       RadioButtonPresenter
    labelName     LabelPresenter
    labelTitle    LabelPresenter
  ).
  labelGreeting label: ''.
  textName autoAccept: true.
  buttonGreet label: 'Greet Me!'; disable.
  self setupTitleRadioButtons.
  labelName label: 'Your name, please?'.
labelTitle label: 'Your title, please?'.And finally we have to tell Spec about the layout. As you can remember, modifying layout is done in the class-side
defaultSpec: defaultSpec
^ SpecLayout composed
"Adding Main column"
newColumn: [ :mainColumn |
"Adding Name row"
mainColumn
newRow: [ :rowName |
rowName
add: #labelName;
add: #textName ].
mainColumn
"Adding Title row"
newRow: [ :rowTitle |
rowTitle
add: #labelTitle;
"Adding Title Radio row"
newRow: [ :rowTitleRadio |
rowTitleRadio
add: #radioMr;
add: #radioMrs;
add: #radioMs ] ].
mainColumn
"Adding Button row"
newRow: [ :rowButton |
rowButton
add: #buttonGreet ].
mainColumn
"Adding Greeting row"
newRow: [ :rowGreeting |
rowGreeting
add: #labelGreeting ] ];
yourself
SpecLayout for the layout of the window; SpecLayout is used whenever you have composite/nested layouts like the greeter's. On lines 8, 15, 27 and 33 rows for Name, Title, Button and Greeting are created. On line 19, the inner row for Title Radio is created.One important thing to note is that when nesting a layout inside another layout using either
newRow: or newColumn:, it should be done inside a block closure.Run
MyFirstWindow new openWithSpec to feast your eyes on your new design!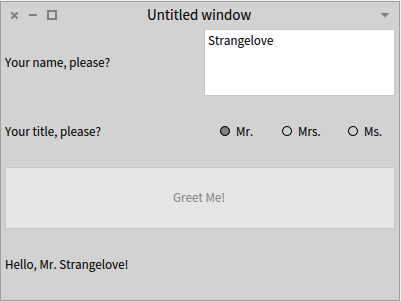 |
| Figure 5 - Greeter with layouts |
What Next?
We've discussed enough for a single episode. It's time that you play with layouts and get acquainted with how they work. As for the greeter, there are still rough edges to fix, like the window title and size or widget height/width. These topics will be covered in the next episode.Image source: buildipedia.com
Comments
Post a Comment